Platform as a Service (PaaS)

PlAwAnSaI

Administrator
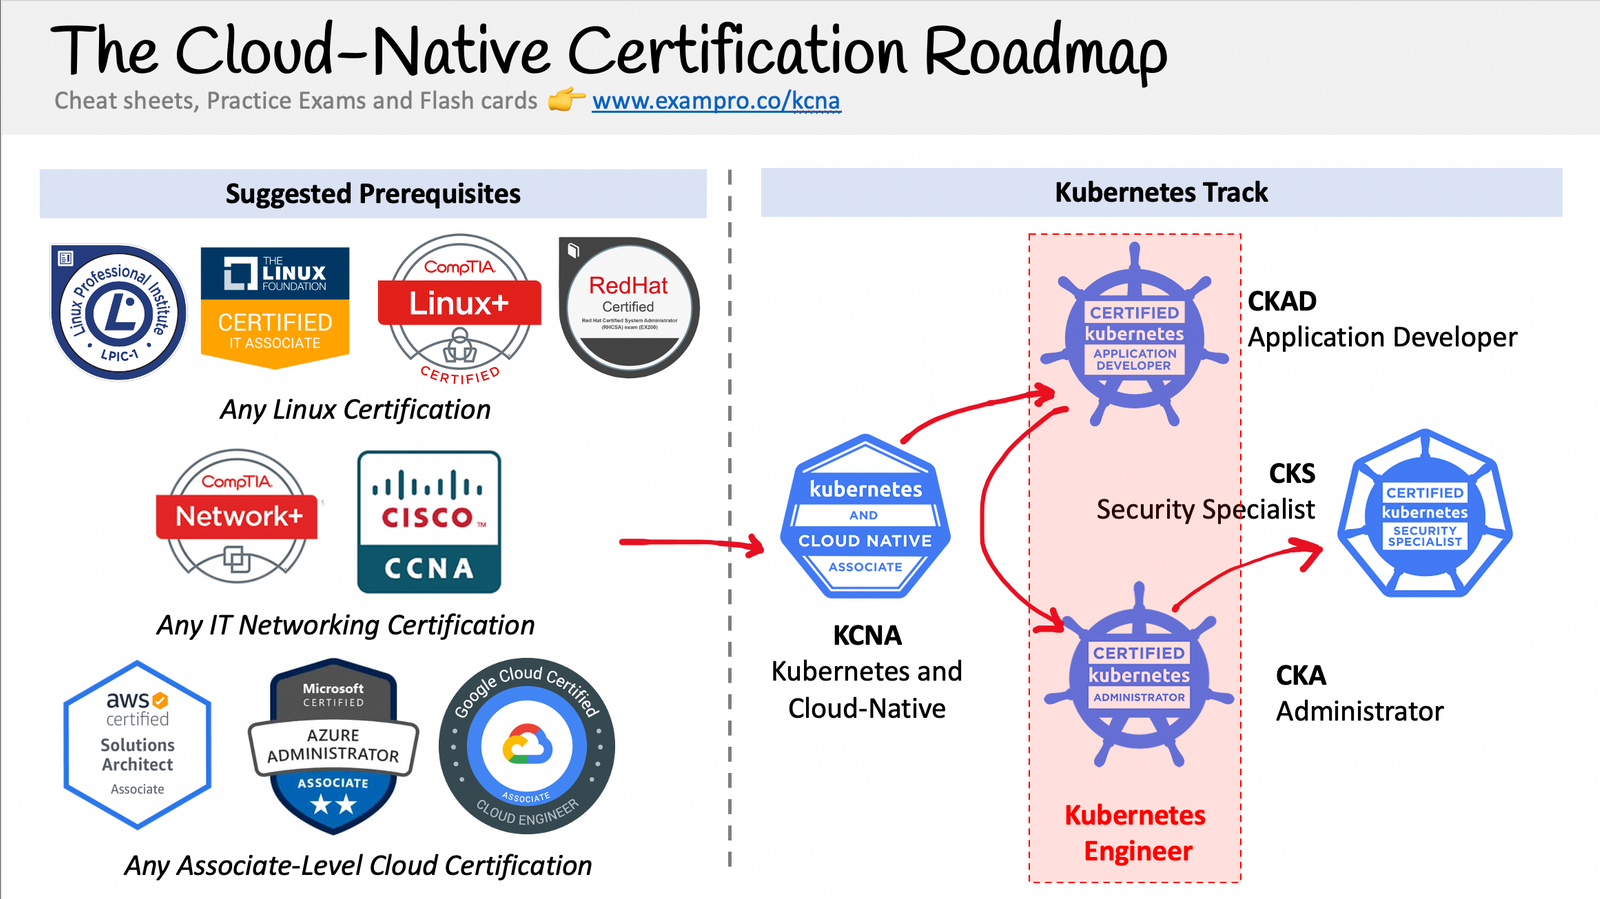
  • The Cloud-Native Certification Roadmap:
    Screen-Shot-2022-03-03-at-10.53.16-AM.png
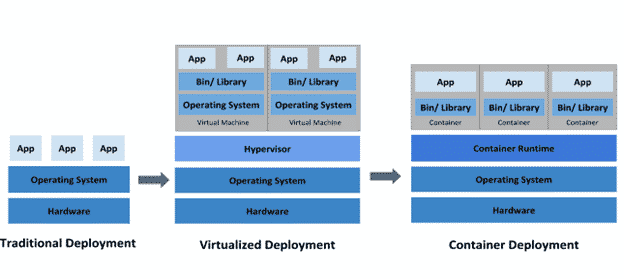
  • รู้จัก Container มันคืออะไร แตกต่างจาก Virtualization อย่างไร:
    www.blognone.com/node/105928

  • Kubernetes คืออะไร ทำไม Orchestration จึงเป็นหัวใจของ Infrastructure ยุคนี้:
    www.blognone.com/node/106492
  • Certified Calico Operator: Level 1 - Learn Kubernetes networking and security fundamentals using Calico Free!
    academy.tigera.io/course/certified-calico-operator-level-1
  • Which Kubernetes Certification Path Should I Take?:
    -n2Yd8HmbzNl1jOo4vRDkF0lqeAqCHnqAFVs5aS-zvJq4zhsPnqfAS1jgI5mU1iCJg5K1DxuzQ1rpo23ntUkR43I7JkEsvVkc1sxj-qCoEkhkHXEC1pdv9RIDyU9PTeRU2ZCnuK0

    acloudguru.com/blog/engineering/which-kubernetes-certification-path-should-i-take
  • Kubernetes 101:
    www.youtube.com/watch?v=GPC6mEuiBBE
  • Kubernetes for Beginner:
    medium.com/@sikiryl/ep-0-kubernetes-content-e138c25846bb
  • https://www.proen.cloud
The Kubernetes Network Model:

162689425_1351961708523383_1881848213416324495_n.jpg

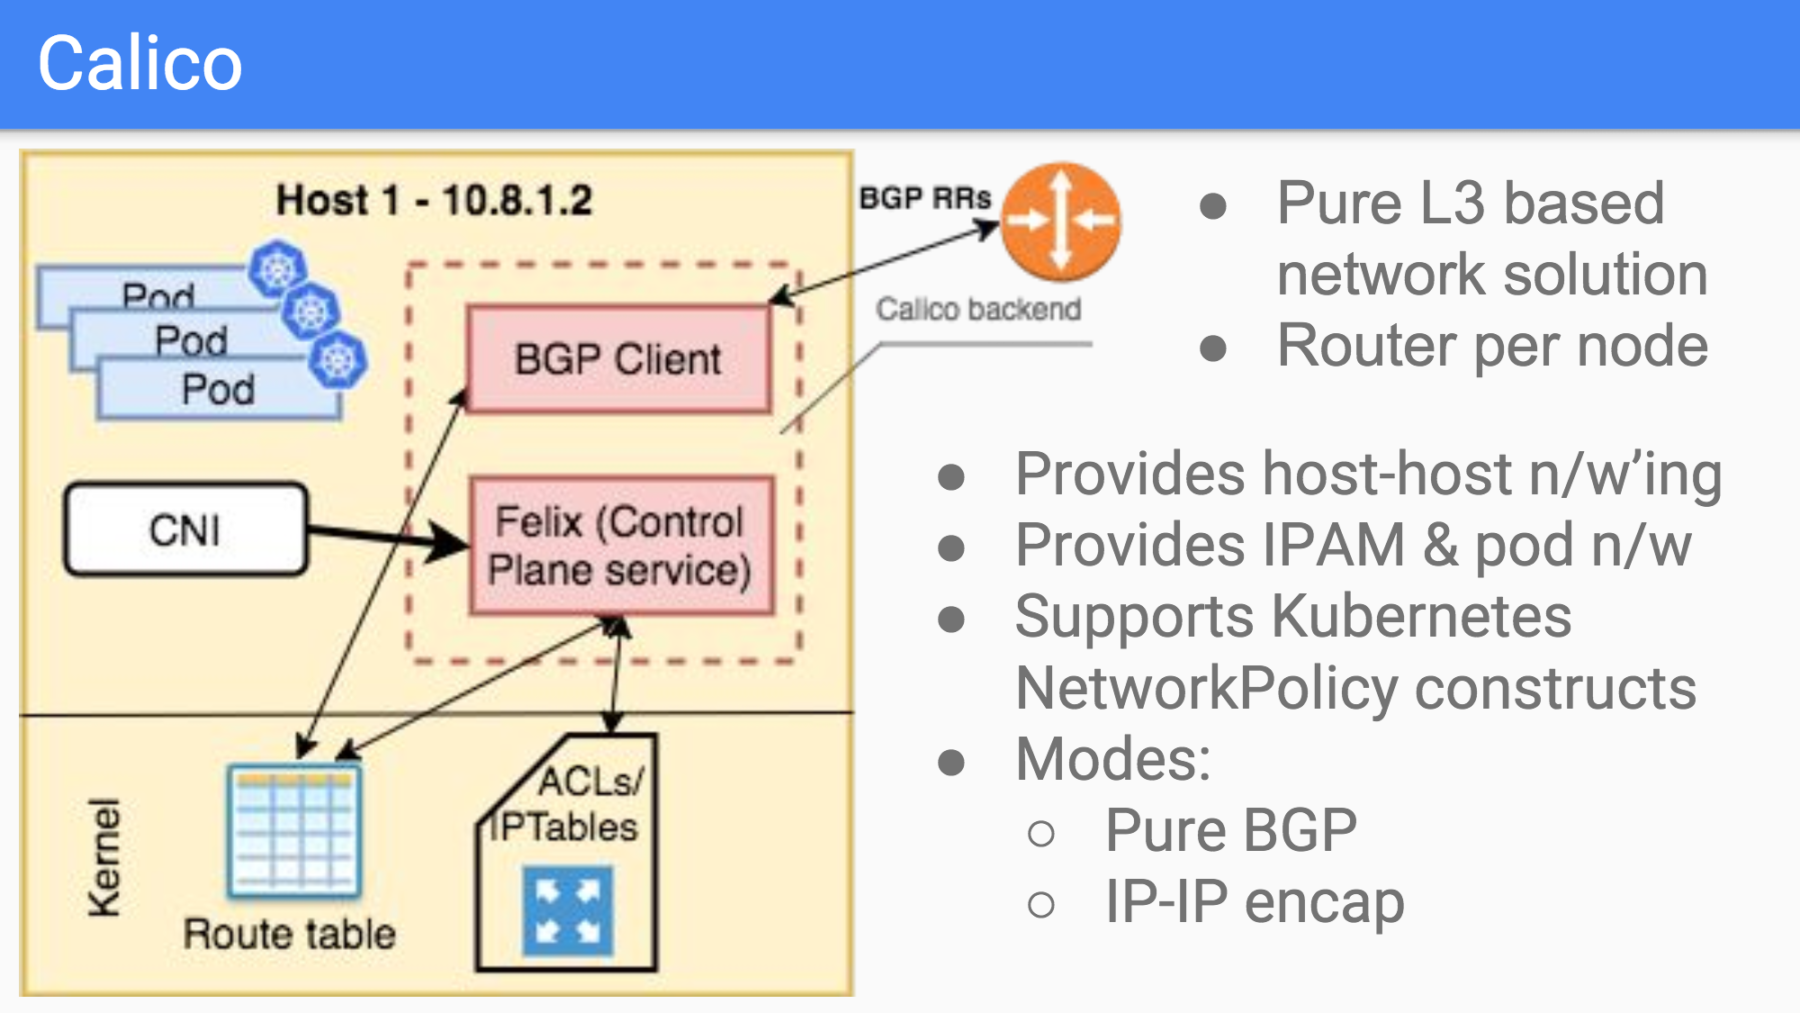
  • IP per Pod -> VMs & Processes ≈ Pods & Containers
  • Isolation with Network Policy -> simple 'flat' network
Kubernetes Network Implementations:
162623021_1352003851852502_8030404104839463741_n.png

  • Host Local IPAM CNI Plugin
  • Other CNI Plugins
  • Network Policy
  • Performance & Encryption
Kubernetes DNS:
162799768_1352006341852253_8975840413428598805_n.png

  • Example service: my-svc.my-namespace.svc.cluster-domain.example
  • Pod in cluster: my-svc.my-namespace
  • Pod in my-namespace: my-svc
Outgoing NAT:
162970745_1352009995185221_2974211692487978153_n.png

  • Pod IPs may not be routable outside of the cluster (e.g. overlay network)
  • The key principles of the Kubernetes networking model:
    • Every pod gets its own IP address
    • Containers within a pod share the pod IP address and can communicate freely with each other
    • Pods can communicate with each other directly without NAT
    • Network isolation is provided by network policy
    • The Kubernetes network model requires L3 (IP) connectivity only. Pods may be in the same CIDR, but are normally not strictly in the same subnet as they don't have L2 connectivity.
    • Kubernetes supports overlay and non-overlay networks.
    • The Kubernetes network model does not require that pods can communicate with workloads outside of the cluster without NAT. For example, if the pod network is an overlay, then it needs to NAT outgoing traffic.
  • Kubernetes supports network plugins using CNI API.
    • Kubenet built into Kubernetes and can provide some very basic networking, but is not an API used by Kubernetes network plugins.
    • Network plugins can implement IP Address Management, but IPAM is not an API.
    • Kubernetes supports a REST API for managing Kubernetes resources, but uses a different API for network plugins.
  • Kubernetes Services:
    • Can be though of as a virtual load balancer built into the pod network
    • Normally use label selectors to define which pods belong to a Service
    • Are discoverable by pods through the Kubernetes DNS service
    • May include external load balancer
    • The Kubernetes network model does specify that pods can communicate with each other directly without NAT. But a pod communicating with another pod via a service is not direct communication, and normally will use NAT to change the connection destination from the service to the backing pod as part of load balancing.
  • Calico can be installed:
    • As part of hosted Kubernetes platform (e.g. Amazon Elastic Kubernetes Service (AWS EKS), Azure (AKS), Google Engine (GKE), IBM Cloud (IKS))
    • As part of a kubernetes distro or installer (eg. kops, kubespray, micro8s, etc.)
    • Using YAML manifests
    • Using the Tigera Calico operator
What is Network Policy?:
161466277_1352146498504904_181259392287455542_n.png

  • Simple 'flat' network
  • Isolation is not defined by the structure of the network
Why is Network Policy Important?:
  • Attacks continue to grow in sophisticated and volume
  • Traditional firewalls struggle with dynamic nature of Kubernetes
  • Network Policy is label selector based -> inherently dynamic
  • Empowers teams to adopt 'shift left' security practices
  • apiVersion: networking.k8s.io/v1
    kind: NetworkPolicy
    metadata:
    name: blue-policy
    namespace: production
    spec:
    podSelector:
    matchLabels:
    color: blue
    ingress:
    - from:
    - podSelector:
    matchLabels:
    color: red
    ports:
    - port: 80
  • apiVersion: projectcalico.org/v3
    kind: NetworkPolicy
    metadata:
    name: blue-policy
    namespace: production
    spec:
    selector: color == 'blue'
    ingress:
    - action: Allow
    protocol: TCP
    source:
    selector: color == 'red'
    destination:
    ports:
    - port: 80
:cool:
 
Last edited:

PlAwAnSaI

Administrator

  • apiVersion: projectcalico.org/v3
    kind: GlobalNetworkPolicy
    metadata:
    name: red-policy
    spec:
    order: 100
    selector: color == 'red'
    ingress:
    - action: Deny
    source:
    selector: color == 'blue'
    - action: Allow
    source:
    serviceAccounts:
    selector: color == 'green'
  • apiVersion: projectcalico.org/v3
    kind: NetworkSet
    metadata:
    name: external-database
    namespace: staging
    labels:
    role: db
    spec:
    nets:
    - 192.51.100.0/28
    - 203.0.113.0/24
  • apiVersion: projectcalico.org/v3
    kind: HostEndpoint
    metadata:
    name: my-host-eth0
    labels:
    role: k8s-worker
    environment: production
    spec:
    interfaceName: eth0
    node: my-host
    expectedIPs: ["10.0.0.1"]
Network Policy Support:
Kubernetes Network Policy:
  • Ingress & egress rules
  • Pod selectors
  • Namespace selectors
  • Port lists
  • Named ports
  • IP blocks & excepts
  • TCP, UDP, or SCTP
Calico Network Policy:
  • Namespaced & global scopes
  • Deny and log actions
  • Policy ordering
  • Richer matches, including:
    • ServiceAccounts
    • ICMP
  • Istio integration, including:
    • Cryptographic identity matching
    • Layer 5-7 match criteria
165574231_1355997291453158_4706695929429025409_n.png

Ability to protect Hosts:
166184384_1356020014784219_7357786956230997019_o.png
Istio Integration:
  • apiVersion: projectcalico.org/v3
    kind: GlobalNetworkPolicy
    metadata:
    name: summary
    spec:
    selector: app == 'summary'
    ingress:
    - action: Allow
    http:
    methods: ["GET"]
    paths:
    - exact: "/foo/bar"
    - prefix: "/baz"
    source:
    serviceAccounts:
    names: ["customer"]
  • Single familiar network policy model
  • Match on L5-7 application layer attributes
  • Match cryptographic identity of Service Accounts
  • Multiple enforcement points
    • Network infrastructure layer
    • Service mesh layer
Extendable with Calico Enterprise:www.tigera.io/tigera-products
Best Practices for Network PolicyIngress and Egress:
  • apiVersion: projectcalico.org/v3
    kind: NetworkPolicy
    metadata:
    name: blue-policy
    namespace: production
    spec:
    selector: color == 'blue'
    ingress:
    - action: Allow
    protocol: TCP
    source:
    selector: color == 'red'
    destination:
    ports:
    - 80
    egress:
    - action: Allow
    protocol: TCP
    destination:
    selector: color == 'green'
    ports:
    - 80
Default Deny:
  • All pods in all namespaces
  • All host endpoints
  • Including the control plane!
    • (Except for configured Calico 'failsafe' ports)
Default App Policy:
  • Non-system pods only
  • Always allow DNS queries to kube-dns
Hierarchical Network Policy:
166580039_1356535361399351_2781593589835511279_o.png
  • Traditional enterprise network security was implemented using Designing a physical topology of network devices (firewalls, routers, switches) and Static IP address ranges.
  • Kubernetes network security:
    • Assumes a flat pod network
    • Is defined using network policies, enforced by network plugins, decoupled from the underlying network capabilities
    • Abstracted from the network by using label selectors
  • Traditional firewalls work with Kubernetes by Use them at the perimeter.
Building Containerized Applications on AWS:

Containers:
  • Docker
  • Registries
  • Building images
Computing platforms:
  • Bare-metal => Virtual machines => Containers
Containerization terminology:
  • Container
  • Image
  • Registry
A container is...:
  • ...everything an application needs, from dependencies to environment variables.
A container image is...:
  • ...the packaged configuration needed to deploy a running container.
A registry is...:
  • ...similar to a source code repository, holding container images.
  • Amazon Elastic Container Registry
Docker components:
  • Docker daemon
  • Docker CLI
  • Image registry
Docker client:
  • docker create
  • docker run
  • docker rm
A dockerfile is a set of instructions to build a container.
  • FROM ubuntu:16.04

    MAINTAINER PlaWanSai "plawansai@notarealemail.com"

    RUN apt-get update -y &&
    apt-get install -y python-pip python-dev

    COPY ./requirements.txt /app/requirements.txt

    WORKDIR /app

    RUN pip install -r requirements.txt

    COPY . /app

    EXPOSE 8080

    ENTRYPOINT [ "python" ]

    CMD [ "app.py" ]
https://aws.amazon.com/cloud9/pricing
Building Modern Python Applications on AWS:
  • :~/environment $ python --version
  • ~/environment $ pip install boto3
Client interface:
  • Low level
  • One-to-one map to AWS APIs
  • Responses come as Python dictionaries
cool.gif
 

PlAwAnSaI

Administrator

Resource interface:
  • Higher level interface
  • Object-oriented
  • Wrapper for client
  • Exposes a subset of AWS APIs

    client.py:
  • import boto3

    client = boto3.client('s3')

    response = client.list_objects(Bucket='aws-bma-test')

    for content in response:
    obj_dict = client.get_object(Bucket='aws-bma-test', Key=content)
    print(content, obj_dict)

    resource.py:
  • import boto3

    s3 = boto3.resource('s3')
    bucket = s3.Bucket('aws-bma-test')
    # the objects are available as a collection on the bucket object
    for obj in bucket.objects.all():
    print(obj.key, obj.last_modified)

    # access the client from the resource
    s3_client = boto3.resource('s3').meta.client
Sessions:
  • Default session is created when create a client or resource
  • Use to set up credentials and region
S3 select:
  • A feature of S3
  • Submit a SQL query to read/filter a subset of data in an object
  • Data filtering done by S3, not your code
Kubernetes 101:
Virtual Machines vs Containers:
Kubernetes คืออะไร?:
  • K8s คือระบบ Open-source ที่ใช้ในหาร Deploy, Scale และจัดการ Container แบบอัตโนมัติ โดยการจัดกลุ่ม Container ให้เป็นหน่วยทำให้ง่ายต่อการจัดการ
องค์ประกอบของ Kubernetes:
  • Hardware:
    • Nodes
    • Cluster
    • Persistent Volumes
  • Software:
    • Containers
    • Pods
    • Deployment
    • Ingress
Nodes:
  • Worker Machine ของ Kubernetes เป็นได้ทั้ง Virtual Machine หรือ Physical Machine ซึ่งใน Kubernetes จะแบ่ง Node ออกเป็นสองประเภท ได้แก่ Master และ Worker Node

    nodes.png
Cluster:
  • กลุ่มของ Node เมื่อมีการ Deploy Application, Cluster จะทำการกระจายงานไปยัง Node ต่างๆ

    cluster.png
Persistent Volumes:
  • พื้นที่จัดเก็บข้อมูลที่ถูกต่อเข้ากับ Cluster ใช้สำหรับบันทึกข้อมูลที่มาจาก Pods เนื่องจากข้อมูลใน Pods จะถูกลบไปพร้อมกับ Pods

    kube_cluster.png
Containers:
  • ภาชนะที่บรรจุ Application รวมไปถึง Environments และ Package ต่างๆ ที่จำเป็นต้องใช้ใน Run Application ให้อยู่ในรูป File, File เดียว

    container.png
Pods:
  • กลุ่มของ Container ที่ถูก Deploy อยู่บน Host เดียวกัน ใช้ทรัพยากรและ Network ร่วมกัน เป็นหน่วยที่เล็กที่สุดซึ่งใช้ในการ Run Application หากมีการใช้งานที่มากจน Pod เดียวไม่สามารถรับไหว Kubernetes สามารถปรับเพิ่มจำนวน Replica หรือสำเนาของ Pod เพื่อให้รองรับการทำงานได้
Deployment:
  • ใช้ประกาศจำนวน Replica หรือสำเนาของ Pod ที่ใช้ Run และคอยตรวจสอบจำนวน Pod ให้เป็นไปตามที่ตั้งค่าไว้

    main-qimg-1c38e47c9e43ff8b24bd3672e1eb5f8b
Ingress:
  • ชุดของ Routing Rules ที่กำหนดว่าบริการจากภายนอกจะเข้าถึงบริการที่ทำงานภายใน Kubernetes Cluster ได้อย่างไร

    ingress.png
Kubernetes Architecture:
Kubernetes Cluster ประกอบด้วย:
  1. Master Node ที่เป็นตัวควบคุม
  2. Worker Node ที่เป็นตัวทำงาน
kubernetes-architecture-diagram.png
Master Node:
  • จะคอยรับคำสั่งจาก CLI (Command Line Interface) ที่เรียกว่า kubectl หรือ UI (User Interface) ผ่าน API จากนั้นจะทำการประมวลผลแล้วสั่งการไปที่ Worker Node โดย Master Node จะประกอบไปด้วย
    1. API Server
    2. Key-Value Store (etcd)
    3. Controller
    4. Scheduler
API Server:
  • เป็นองค์ประกอบแรกของ Kubernetes Cluster ที่เปิดใช้งาน มีหน้าที่รับคำสั่งจากผู้ใช้ โดยจะมีการตรวจสอบความถูกต้องของผู้ใช้ก่อน ถ้าถูกต้องก็จะทำการ Update ทรัพยากรของ Kubernetes ใน etcd ตามคำสั่งของผู้ใช้
Key-Value Store (etcd):
  • เป็นแหล่งเก็บข้อมูลสำรองที่บันทึกการกำหนดค่าให้กับ Cluster โดยจะบันทึกการกำหนดค่าทั้งหมดและสถานะของ Cluster ซึ่ง Master Node จะทำการดึงข้อมูลสถานะของ Nodes, Pods และ Container จาก etcd
Controller:
  • เป็นส่วนที่รับคำสั่งจาก API Server แล้วตรวจสอบกับสถานะปัจจุบันของ Node ที่ได้รับคำสั่งให้ควบคุม ถ้าพบว่าสถานะของ Node นั้นๆ มีความแตกต่างกัน ก็จะดำเนินการ Update นอกจากนี้ Controller ยังมีหน้าที่รักษาระบบให้อยู่ในสถานะที่ต้องการอย่างต่อเนื่องโดยการเปรียบเทียบกับสถานะปัจจุบันของระบบ
Scheduler:
  • มีหน้าที่ค้นหาและกำหนด Node ที่เหมาะสมสำหรับการใช้สร้าง Pod โดย Scheduler จะทำการตรวจสอบทรัพยากรของ Node เพื่อหา Node ที่เหมาะสมตามข้อกำหนดของ Pod จากนั้นจึง Deploy Pod ไปยัง Node นั้นๆ
Worker Node:
  • ทำหน้าที่ Run Container ตามคำสั่งที่ได้รับมาจาก Master Node จากนั้นจึงรายงานผลกลับ โดย Worker Node จะประกอบด้วย
    1. Kubelet
    2. Container Runtime
    3. Kube-proxy
Kubelet:
  • เป็นส่วนที่คอยรับคำสั่งที่ส่งมาจาก API Server แล้วติดต่อกับ Container Runtime ให้ Pull Image ที่ต้องการในการ Run Pods นอกจากนี้ Kubelet ยังคอยตรวจสอบ Pods เพื่อแจ้งกลับไป Master Node ในกรณีที่ Pods เกิดข้อผิดพลาดในการทำงาน
Container Runtime:
  • เป็นส่วนที่ใช้ Run Container ใน Pod (เช่น Docker, ContainerD เป็นต้น) โดยจะ Pull Image ที่ต้องการมาจาก Container Image Registry
Kube-proxy:
  • ทำหน้าที่ Load-balance Traffic ที่กำหนดไว้ใน Services ไปยัง Pods ที่ถูกต้อง เพื่อเปิดให้ภายนอกสามารถเข้าถึง Pod ที่อยู่ภายในได้
https://www.katacoda.com/courses/kubernetes/playground
https://cloud.google.com/kubernetes-engine/kubernetes-comic
DevSecOps Series from Zero to Hero:https://www.skooldio.com/bundles/bundle-devsecops-docker-kubernetes
What is Docker?
Docker Container:
Picture8.png
  • Docker คืออะไร? เครื่องมือยอดนิยมที่จะช่วย Dev ทำงานเร็วขึ้น 2 เท่า!
  • ทำไมต้องใช้ Docker?
  • Container แตกต่างจาก Virtual Machine อย่างไร?
  • ตัวอย่างขององค์กรที่ใช้ Docker
  • ข้อดี และข้อเสียของ Docker
  • แล้วทำไม Docker ต้องเป็นปลาวาฬ
https://blog.skooldio.com/what-is-docker
Where Docker can run?:
  • Native: ubuntu, CentOS, redhat, alpine, debian, CoreOS, Windows Server 2016, 2019
  • VM: Windows 10, macOS
ทำความรู้จัก Docker ฉบับนักพัฒนา Web

https://kodekloud.com/docker-certified-associate-dca-the-ultimate-certification-guide-for-2021
cool.gif
 

PlAwAnSaI

Administrator

DevOps & DevSecOps Trend:https://trends.google.co.th/trends/explore?date=today%205-y&q=DevOps,DevSecOps,System%20Engineer

Global DevOps Salary:
Salaries-800x600.png
Business in IT Industry:
  • Idea > Dev > Ops > Sec > Money
Ideal Development Cycle:
  • Dev > Code > Ops & Sec > Feedback > Dev
But Reality make Silo by The team Wall.

DevSecOps Culture:
  1. Remove the walls
  2. Shorten btw team
  3. Faster btw team
  4. Security in every steps
Making an IT product:
  • Discovery: Idea > Design Thinking
  • Delivery: Coding > Agile: Scrum, Kanban
  • Operation: Support > Dev(Sec)Ops
DevSecOps:
  • Agile Focus:
    • Plan > Code > Build > Test
  • DevOps Focus on Automation:
    • Build > Test > Package > Release > Configure > Monitor
  • Security in every steps with Automation
Certified Scrum Master (CSM) Course:
  • https://medium.com/@supawatnera/certified-scrum-master-course-by-bas-vodde-3eee11bc02d0
  • https://medium.com/@supawatnera/เริ่มเช้ามาด้วยความตื่นเต้น-จะเรียนรู้เรื่องมั๊ย-จะฟังรู้เรื่องมั๊ย-ade25053e9a0
  • https://medium.com/@supawatnera/csm-by-bas-vodde-1st-day-part-2-f9dbd69afb97
  • https://medium.com/@supawatnera/csm-by-bas-vodd-day-2-เท่าที่จำได้-580e86db3cc3
Cloud Native Computing Foundation (CNCF) Landscape / DevSecOps Technologies

Generic DevSecOps Flow & Components:
  1. Version Control System (VCS)
  2. CI/CD and Artifacts
  3. Infrastructure: Cloud, Container, Docker Kubernetes
  4. Monitoring
  5. Automation Security
VCS is a system that records changes to a file or set of files over time so that can recall specific versions later.
  • Good for text file
  • Not recommend for binary file (doc, xls, ppt, image) because of the frequency changing
Version Control Software:
logo-3.png
Git is a free and open source distributed version control system designed to handle everything from small to very large projects with speed and efficiency.

Git Architecture:
Distributed-Version-Control-System-Workflow-What-Is-Git-Edureka.png
Git Features:
  • History:
    • See what exactly be change and when.
    • Really exact. Line by line history.
  • Code Review:
    Allow micro level collaboration between team member.
  • Tag:
    Tagging is generally used to capture a point in history that is used for a marked version release (i.e. v1.0.1)
  • Git Branching:
    means diverge from the main line of development and continue to do work without messing with that main line
Continuous Integration (CI) and Continuous Delivery/Deployment (CD):
  • CI =
    • Build = Comply

      hero-feed-logos.png
    • Test:
      • Unit Test:
      • Integration Test
      • Functional Test
      • Performance Test
      • Acceptance Test
      • UI Test
      Test Automation Tools:
      • Unit Test: JUnit, nunit, Jest, nose
      • Browser Simulation Test: Selenium, Puppeteer, cypress, Mocha
      • Behaviour Driven Development (BDD): cucumber, Jasmine, appium
        *** Test Cases ***
        Valid Login
        Given browser is opened to login page
        When user "demo" logs in with password "mode"
        Then welcome page should be open

        *** Keywords ***
        Open Browser To Login Page
        Open Browser ${LOGIN URL} ${BROWSER}
        Maximize Browser Window
        Set Selenium Speed ${DELAY}
        Login Page Should Be Open

        Login Page Should Be Open
        Title Should Be Login Page

        Go To Login Page
        Go To ${LOGIN URL}
        Login Page Should Be Open

        Input Username
        [Argument] ${LOGIN URL}
        Input Text username_field ${username}

        Input Password
        [Argument] ${password}
        Input Text password_field ${password}

        Submit Credentials
        Click Button login_button

        Welcome Page Should Be Open
        Location Should Be ${WELCOME URL}
        Titile Should Be Welcome Page
      • Cloud-Based Test: SauceLabs, Firebase Test Lab, App Center, BrowserStack
    • Package:
      • Type of Artifacts: docker, Gradle, npm, python, debian, rpm, nuget, HTML 5, xml, Go, sbt
      • Packaging Tools (Artifacts Server): JFrog Artifactory, GitLab, Nexus, Harbor, docker Registry
  • CD = Release and Configure
    • Release Strategies:
      Deployment:
      • Recreate / Replace: Simple but downtime
        recreate-deployment-ww.png
      • Rolling Deployment: Zero downtime but State 1 - 2 users may confused with 2 versions
        divuxihkun2p186c9mye.png
      • Blue-Green or Red-Black Deployment: Zero downtime & Fast Switching & Easy to rollback but expensive
        m664yyotixnqncprryf0.png
      • Canary Deployment: Weight deployment to new version 10%, 20%, ..., 100%
        zvf9rbd1x38umph98zro.png
      Feature:
      • A/B Testing: Add A & B versions for testing & gathering information
      • Environment Separation: prod.myapp.com & beta.myapp.com
      • Feature Toggles or Feature Flag &
      • User Targeted Testing: Add features to the specific users
        • Sticky Session
        • User Agent
        • Source IP Address
        • Header
        • Cookie
        • User Specific
Popular CI/CD Tools:
  • On-Premise Open Source: GitLabRunner, Jenkins, Spinnaker, go, flux, argo, Concourse
  • On-Premise Commercial: TC, Bamboo
  • On-Cloud: circleci, Travis CI, Azure DevOps, Elastic Beanstalk
cool.gif
 

PlAwAnSaI

Administrator

Getting Started with WordPress, Kubernetes, and Apps Security

IDC Report: Worldwide IT Industry 2020 Predictions
IDC Report คาดการณ์ว่าภายในปีหน้า 2565, 70% ขององค์กรทั้งหมด จะมีการนำ Cloud มาใช้ — ทั้ง Public และ Private Cloud — โดยการ Deploy แบบ Hybrid/Technology Multicloud, Tool, และกระบวนการ
ผลกระทบด้านธุรกิจและ IT:
  • Cloud จะกลายเป็นยุทธศาสตร์
  • ขนาดและความคล่องตัวจะเป็นคุณลักษณะของ Solution Multicloud ที่สำคัญ
  • API-driven, และใช้ SaaS มากขึ้น
คำแนะนำ:
  • จัดลำดับความสำคัญของ SaaS ตามข้อเสนอการจัดการและการกำกับดูแล
  • ID ที่เกี่ยวข้องและ KPI ที่วัดได้เพื่อขับเคลื่อนการจัดการ Multicloud
  • Bimodal IT ตายแล้ว - ถึงเวลาที่จะรวม IT ทั้งหมดเข้ากับ Digital-first Model
    • Bimodal IT หมายถึงแนวทางด้าน IT 2 รูปแบบ ได้แก่:
      รูปแบบที่ 1: แบบดั้งเดิม — เน้นความปลอดภัย ความถูกต้องแม่นยำ และความพร้อมใช้งาน
      รูปแบบที่ 2: แบบไม่คงที่ (Nonlinear) — เน้นความคล่องตัวและความเร็ว
ก้าวล้ำสู่ยุค Apps Explosion ที่จะย่อโลกทั้งใบให้อยู่ในมือคุณ

ภายในปี 2566, App และบริการ Digital กว่า 500 ล้านตัวจะถูกพัฒนาและ Deploy โดยเป็น Cloud-native ซึ่งส่วนใหญ่ เพื่อที่จะทำ Digital Transformation โดยเฉพาะในอุตสาหกรรม
ผลกระทบด้านธุรกิจและ IT:
  • App และบริการใหม่พวกนี้ จะแข่งกันสร้าง Minimum Requirement ขึ้นมาใหม่
  • การพัฒนาขยายตัวเพิ่มมากขึ้น
  • การจัดการ App จะเข้มข้นขึ้นด้วย Scale ใหม่
คำแนะนำ:
  • พัฒนาข้อมูลการแข่งขันที่แข็งแกร่งด้วย Digital Transformation (DX) ในอุตสาหกรรมของคุณ
  • Integrate “โรงงานนวัตกรรม Digital” เข้ากับการจัดการและวางแผนผลิตภัณฑ์หลัก
  • ตรวจสอบให้แน่ใจว่า "ทุกคนให้ความช่วยเหลือ" - เพื่อขยายกำลังแรงงานด้านนวัตกรรม Digital
Virtual Machine vs. Container

ความท้าทายของ Virtual Machine:
  • ใช้เวลานานในการเตรียมการ เพราะ Application นึง ต้องการทั้ง Load Balance และ Database
  • ปรับขนาดยาก
  • Guest OS (Linux / Windows) ใช้ทรัพยากรการประมวลผล​มาก
ความท้าทายที่โครงสร้างพื้นฐานด้าน IT ต้องเผชิญในปัจจุบัน:

  1. ด้านเวลา:
    • ทุกอย่างใช้เวลานานเกินไป
    • ต้องกำหนดค่าด้วยตนเอง (Manual Configuration)
    • มีการทำงานซ้ำๆ
  2. ความซับซ้อน:
    • ยากในการดูแลรักษา และเปลี่ยนแปลง
    • ต้องมีการ Upgrade และ Patch บ่อย
    • มาตรฐานแต่ละ Cloud ไม่เหมือนกัน
  3. และสุดท้ายเรื่องค่าใช้จ่าย:
    • การจัดการโครงสร้างพื้นฐานมีราคาแพง
    • ปัญหาของขนาดที่เหมาะสม
    • ต้องหาคนมาทำ Cloud เพิ่ม ทำให้มีค่าใช้จ่ายมากขึ้น
PROEN Any Cloud อาสาจะมาตอบโจทย์ให้ เป็นยังไงบ้างเรามาดูกัน:
เป็นบริการ Cloud ในไทยรูปแบบ Platform-as-a-Service (PaaS) ที่จะทำให้ชีวิตง่ายมากขึ้น
PROEN Any Cloud Platform:
  1. เราอยู่บน Infrastructure ไหนก็ได้ ไม่ว่าจะเป็น Physical Server, VM, Private Cloud, หรือ Public Cloud
  2. โดยสามารถ Deploy ได้จาก Image บน Docker Hub, Pipeline ทำ CI/CD สำหรับ Programmer ที่บอกว่าอยากจะทำ Automation ทำเป็น DevOps เต็มๆ หรือ DevSecOps เราก็ใช้ Pipeline พวกนี้ Connect เข้ากับ Kubernetes, Container, หรือ Serverless ได้, รวมไปถึง Marketplace ซึ่ง Image เราทดสอบแล้วว่าไม่มีช่องโหว่
  3. แต่ว่าอย่างเดิมพวก Traditional Workload เราก็ยังคง Support ในลักษณะของ Virtual Machine ด้วยเช่นกัน เพราะฉะนั้น เราจะ Support ทั้ง Virtual Machine และ Modernized Application รวมไปถึงเป็น Monolith ด้วย
  4. และสามารถบริหารจัดการทุกอย่าง รวมถึง Monitor ผ่านหน้า Web PROEN Cloud เพียงหน้าเดียว ยังสามารถ Alert ได้ด้วย เช่น CPU สูงขึ้น, เวลาเพิ่ม Scale Out ออกมา
PROEN Any Cloud:
  • โดยลูกค้าของเราสามารถเลือกได้ว่าจะอยู่บน Public Cloud หรืออยู่บน Private Cloud หรือจะอยู่บนเครื่อง Server ลูกค้าเลยก็ได้
  • ตัว Public Cloud เราก็มีให้เลือกหลาย Region ถ้าหากเป็น Application สำหรับคนไทย ก็เลือก Deploy App อยู่ที่ PROEN Region ก็ได้ เรามี Bandwidth 700 Gbps
  • ถ้าหากจะอยู่ที่ Private Cloud เราก็ลง Software ตัว PROEN Cloud บน VMware หรือ Open Stack ของลูกค้า และก็สามารถ Connect เข้ากับ Public Cloud ได้เลย
  • โดยค่าใช้จ่ายจะจ่ายตามการใช้งานจริง ไม่ว่าจะ Cloud ไหนก็ตาม

    แล้วเราจะเลือกจากอะไรดี ว่าจะใช้ Cloud ไหนดี?
  • องค์กรไหน ต้องการที่จะเก็บข้อมูลไว้ภายในองค์กร ไม่อยากจะ Share ออกไปข้างนอก ก็ใช้ Private Cloud ได้
    • ข้อดี: คือทำให้เราสามารถควบคุมข้อมูลต่างๆ และ Infrastructure ของตัวเองได้
    • ข้อเสีย: คือเกิดค่าใช้จ่ายในการ Maintenance หรือต้องจ้างบุคลากรมาดูแลอุปกรณ์ Hardware ของเรา
  • ในส่วนของ Public Cloud ก็จะกลับกันกับ Private Cloud
    • ข้อดี: คือ Application หรือ Image ต่างๆ สามารถใช้ร่วมกับคนอื่นได้บน Cloud Provider และสามารถ Scale ได้ง่ายและรวดเร็ว
    • ข้อเสีย: ก็คือเราจะมีการ Share ข้อมูลต่างๆ ของบริษัท กับ Cloud Provider ไม่ว่าจะเป็น AWS/Azure หรือ Google Cloud ซึ่งบางบริษัทอาจจะมีความกังวลเรื่อง Security เพราะฉะนั้น Public Cloud อาจจะไม่ตอบโจทย์
  • ถัดมาก็จะเป็นในส่วนของ Hybrid Cloud เป็นการผสมผสานระหว่าง Private และ Public Cloud ข้อมูลหรือ Application บางส่วนจะมีการควบคุมโดย Cloud Provider ทุกวันนี้บริษัทส่วนใหญ่จะทำเป็น Hybrid Cloud เนื่องจากว่า สามารถที่จะลดค่าใช้จ่ายได้ในระดับนึง ไม่ต้องกังวลเรื่อง Infrastructure มากนัก
PROEN ก็เลยออก Project Anycloud ออกมา โดยสามารถนำ Software ของเราไปติดตั้งบน Private Cloud ของลูกค้าได้

แค่ Click เดียวในการ Provision บน Any Cloud:
  • อีกจุดเด่นนึงของเราก็คือสามารถ Deploy Application ได้ง่ายๆ เพียงแค่ Click เดียว เช่น การลง Java, node.js, Docker, Kubernetes, GitLab, etc.
ทีนี้ Data Center เรามีอยู่ที่ไหนบ้าง: เรามี Data Center อยู่ทั่วโลก
  1. ในไทยเรามีอยู่ 2 Region:
    1. อยู่ที่ PROEN ที่ตึก CAT บางรัก
    2. และอีกที่นึงอยู่ที่ The Cloud ตรงถนนนวมินทร์
  2. ส่วนต่างประเทศก็จะมี ญี่ปุ่น
  3. จีน
  4. Europe
  5. America
  6. Australia
  7. Singapore
โดยลูกค้าสามารถที่จะเลือกได้ว่าอยากจะ Deploy ไว้ที่ Region ไหน
WordPress: Automate Clustering:
  • สามารถติดตั้งได้ภายใน 5 นาที โดยการเข้าไปเลือกใน MarketPlace แล้วก็ Tick Option ได้ตามต้องการ
Database Service: Automate Clustering:
  • หรือระบบที่ Scale ใหญ่ๆ ต้องการทั้ง NoSQL อาจจะเป็น MongoDB หรือ Redis เป็น MySQL ก็คือเป็น MariaDB อยากจะได้ Database ที่ใหญ่ ต้องทำ Clustering เราก็มี Template เอาไว้ให้ โดยสามารถจะเลือกได้ว่าจะเป็น
    • Primary-Primary
    • Primary-Secondary
    • หรือ Galera Cluster
    ซึ่งตรงนี้ก็ไม่กี่ Click ด้วยเช่นกัน แค่กด Enable Auto-Clustering แล้วก็เลือก Scale CPU กับ Memory ตามที่เราต้องการ ค่าใช้จ่ายก็ไม่ต้องกังวลมาก เพราะเราคิดตามที่ใช้งานอยู่แล้ว
cool.gif
 

PlAwAnSaI

Administrator
จะดีกว่ามั้ยครับ ถ้าฝั่ง Back-end ไม่ต้องเสียเวลาในการเขียน Program เพื่อเรียก Microservice
Kong เป็น Open Source ที่ทำหน้าที่บริหารจัดการ Application Programming Interface (API) หรือที่เรียกกันว่า API Gateway ที่สามารถ Scale ได้ง่าย, มีประสิทธิภาพ และมีความปลอดภัยสูง

1*xklapNW3iN6S3_TNYOourw.png
ตัวอย่างเช่น:
  • inContact บริษัทผู้ให้บริการ Software Cloud Contact Center ก็เป็นลูกค้าเจ้านึงที่ใช้ Kong เพื่อสร้าง Frontend แบบครบวงจร
  • มีทั้ง Monolith, Service และ Microservice เนื่องจากการเข้าซื้อกิจการ เลยจำเป็นต้องรวมเข้าด้วยกันเพื่อทำงานร่วมกัน
  • เค้าเคยลองใช้วิธีแก้ปัญหาแบบเดิมและ Tool เจ้าอื่นแล้ว แต่ก็ไม่มีใครสามารถจัดการได้
  • แต่ Kong เป็น Platform ที่ตอบโจทย์ ที่รวมทุกอย่างเอาไว้ในตัวเดียวเพื่อให้สามารถสร้างสรรค์สิ่งใหม่ๆ ได้เร็วขึ้นโดยที่ไม่กระทบกับบริการอีกด้วย
ทำไม API Gateway ต้อง Kong?:
  • Opensource ซึ่ง Free
  • สร้างมาจาก NGinX ที่ Top 100 Website ทั่วโลกนำมาทำ Web Server หรือ Reverse Proxy ทำให้มีประสิทธิภาพสูง
  • มี Developer ทั่วโลก คอยช่วยให้คำปรึกษา กว่า 130 ชีวิต
  • ใช้ง่าย สามารถ Scale รองรับระบบที่ใหญ่ขึ้นได้
  • มี Plug-in ให้เลือกใช้งานเยอะ สามารถ Extend ได้ ด้วยการเขียน Custom Plugin
  • เป็น Cloud Native คือ สามารถ Deploy บน Cloud ยี่ห้อไหนก็ได้
  • การจัดการก็ง่าย เพราะมี Konga เป็น GUI และยัง Free เหมือนกัน
ในปี 2561 Kong ถูกจัดให้อยู่ในด้าน Visionaries ของ Gartner แต่ด้วย Technology มีการเติบโตแบบก้าวกระโดดอย่างต่อเนื่อง ทำให้ Kong API ได้ขยับขึ้นมาอยู่ตรง Leaders ในด้านของ API Management จนถึงปัจจุบัน

การใช้งานแบบเดิม ที่ทำงานแบบ Monolithic ที่ยากต่อการบริหารจัดการและขยาย ที่ส่งผลกระทบไปถึง Service อื่นๆ และไม่ว่า Service นั้นจะอยู่บน Private, Public, หรือ Partner พวก Function ต่างๆ เช่น Rate-Limit หรือ Authentication จะมีหน้าที่คล้ายๆ กัน ซึ่งนอกจากจะไม่ตอบโจทย์ต่อการใช้งาน Application สมัยใหม่แล้ว ยังมีปัญหาในด้าน Productivity (ประสิทธิผล+ประสิทธิภาพ) อีกด้วย เนื่องจากข้อจำกัดของระบบ Monolithic

Kong ทำให้ผู้ใช้งานสามารถ Focus ไปที่ตัว Product และ Service ใหม่ได้โดยไม่ต้องกังวลเรื่องของการจัดการ API เลย
โครงสร้างระบบแบบเก่า จะต้องมีแต่ละ Feature อยู่ในทุก API เช่น การทำ Authentication, Rate-limit, หรือ Logging
เราสามารถเอา Common Feature เหล่านี้ ให้ตัว API Gateway เป็นคนจัดการ ทำให้ช่วยลดงานของ Developer ลง ไม่ต้องคอยเขียน Code ที่เป็น Rate-limit, Logging, หรือ Authentication นั่นคือสิ่งที่ตัว API Gateway เข้ามาช่วยแก้

ประวัติของ Kong:
  • เริ่มมาจากชื่อ Mashape ในปี 2553
  • API Marketplace
  • เติบโตถึง 250,000 นักพัฒนา และ 20,000 API
  • ขายให้กับ RapidAPI ในปี 2559
Kong 'เกิด' ในปี 2558
  • เพื่อตอบสนองความต้องการของตลาดสำหรับ Open Gateway API ที่คล่องตัว
นักลงทุน:
  • Jeff Bezos ผู้ก่อตั้ง Amazon
  • Eric Schmidt อดีตประธาน Google
  • Andreessen Horowitz (บริษัท VC ที่เป็นที่รู้จักและมีชื่อเสียง)
  • Martin Casado อดีต COO ของ Cisco
  • ด้วยนวัตกรรมที่กำลังเพิ่มมากขึ้น ทำให้โครงสร้างพื้นฐานต้องพัฒนาเพื่อให้รองรับ
  • ความสามารถในการปรับตัวเข้ากับ Technology ใหม่ๆ มีความสำคัญต่อความสำเร็จ
  • ระบบแบบใหม่มีการใช้ระบบแบบแยกส่วน (Distribute) มากขึ้น
  • โลกหลัง Docker/Kubernetes (K8s) ต้องการ Gateway API
  • มีการเปลี่ยนแปลงจาก Box และภาษา Program ต่างๆ นับร้อย มากขึ้นเรื่อยๆ
  • ในปี 2557 - Docker และ K8s ก็เกิดขึ้นมา ทำให้มีการใช้งาน API และ Microservices เพิ่มมากขึ้น
  • ยังไม่มีใครสนใจ Gateway API เพราะระบบยังไม่ซับซ้อนมากนัก แต่เมื่อมีบริการและจำนวน API เพิ่มขึ้น ความต้องการ Gateway ก็เพิ่มขึ้น “เหมือนเจ้าหน้าที่ควบคุมการจราจรทางอากาศของสนามบิน”
3 Trend หลักที่ขับเคลื่อนความต้องการใหม่ของ API:
  1. ข้อมูลมีการเปลี่ยนแปลงตลอดหมายความว่าเราต้องสามารถปรับขนาดได้อย่างมีประสิทธิภาพตามความต้องการ
    ภายในปี 2568, 25% ของข้อมูลที่สร้างขึ้นทั่วโลกจะเป็นข้อมูลแบบ Realtime โดยธรรมชาติ
  2. สถาปัตยกรรมแบบแยกส่วน (Distribute) ต้องการ Latency ที่ต่ำกว่าจึงจะสามารถทำงานได้ดี
    จะมีบริการใหม่ๆ เกิดขึ้นมากมาย บริษัทต่างๆ เติบโตจาก 1 เป็น 10 เป็น 100
  3. สถาปัตยกรรมสมัยใหม่มีความซับซ้อนและผสมผสานเทคโนโลยีสมัยเก่ากับใหม่ API จึงต้องมีความยืดหยุ่นในการทำงานกับทั้งสองแบบ
คุณพร้อมหรือยังสำหรับก้าวต่อไปของการเดินทาง?:
  • ทุกองค์กรในปัจจุบันมีการใช้งาน API อยู่แล้ว ไม่ว่าจะตั้งแต่ 1 API ไปจนถึงหลาย API
  • ยิ่ง Application มีขนาดใหญ่ มีความซับซ้อนมากขึ้น ก็จะยิ่งมี Service เพิ่มมากขึ้น
API และ Platform กำลังเปลี่ยนไป องค์กรกำลังเปลี่ยนจาก Monolith ไปเป็นบริการ และเป็น Microservice หรืออาจจะเป็นแบบ Serverless เลย โดย Monolith อาจไม่ได้หายไป แต่สามารถแยกส่วนต่างๆ ของมันออกมา หรือสามารถสร้างผลิตภัณฑ์หรือ Application ใหม่ในสถาปัตยกรรมที่แตกต่างจากเดิม สิ่งเหล่านี้อาจทำงานอยู่ในโครงสร้างพื้นฐานเดียวกัน

ดังนั้นสำหรับ Kong เราจึงสร้างระบบที่ทำงานได้ดีกับกรณีการใช้งานแบบ Monolith แบบดั้งเดิม แต่ก็ไม่ได้ป้องกันผู้ใช้จากการนำ Style อื่นๆ ไปใช้ ขณะที่องค์กรก้าวไปข้างหน้าและสร้างสรรค์สิ่งใหม่ๆ Kong สามารถรองรับสถาปัตยกรรมแบบ Hybrid ที่ทำขึ้นจากสิ่งเหล่านี้ได้ในเวลาเดียวกัน สามารถเรียกใช้ Cluster Kong ที่รองรับทั้ง Monolith, Service, Serverless, ฯลฯ Kong ยังมีความสามารถในการเพิ่มมูลค่าให้กับ Traffic N-W และจัดการ Traffic E-W, ระหว่างกลุ่ม และบริการต่างๆ, ฯลฯ ได้ดี

และระบบทั้งหมดยังรองรับ Auto Scale ด้วย
  • คือ Scale แนวตั้ง จะเป็นการเพิ่ม CPU, Memory ตามการใช้งาน
  • หากเครื่องเดียวไม่พอ ก็สามารถตั้ง Policy ให้เพิ่มจำนวนเครื่องได้
และ Model การ Charging ของเราใช้เท่าไหร่จ่ายเท่านั้น:
  • อย่างเช่นชั่วโมงแรกใช้ 8GiB ก็จ่ายเงินแค่ 8GiB
  • ชั่วโมงที่สอง 25GiB ก็จ่ายแค่ 25GiB
  • ชั่วโมงที่สามใช้อยู่ 10GiB ก็จ่ายลดลงมาเหลือ 10GiB
จุดเด่นอีกตัวนึงของทางเราคือเรื่องของ Cloudlet:
  • จะเป็นหน่วยประมวลผลของเราที่ค่อนข้างละเอียด 1 Cloudlet จะมี Memory 128 MiB, 400MHz CPU ซึ่งจะทำให้การ Scale เราค่อยๆ ขยับทีละหน่อย ทำให้ประหยัดค่าใช้จ่ายได้มากขึ้น
เราไม่คิดค่า Bandwidth ทั้ง Domestic และ International หากใช้บริการ PROEN-TH Region เพราะ Cloud ของเราสนับสนุนคนไทยด้วยกัน
นอกจากเรื่อง Infrastructure แล้วเรายังมี Valued Added Services อย่างเช่น:
  • ลูกค้าอาจจะใช้ On-premise หรือ Cloud ที่อื่นอยู่ เราก็สามารถไปช่วย Design ให้ได้ เช่น ปัจจุบันลูกค้าใช้ Monolith เครื่องเดียวมีทั้ง Load-balance, Application, Database เราสามารถจับแยกออกมาเป็น 3 Tier ได้ แถมยัง Design CDN ให้ด้วย ซึ่งเราจะ Optimize Cost ให้ด้วย
  • อย่างที่สองคือเรื่องของการ Migration ไปเป็น Microservice หรือ Kebernetes เราก็ Migrate ให้ได้
  • รวมไปถึงอยากจะทำ Automation, CI/CD pipeline
  • หรืออยากจะดูว่า Source Code มีคอขวดตรงไหนรึเปล่า เราก็สามารถ Optimize ให้ได้
  • นอกจากนั้นสองกล่องสุดท้ายจะเป็น Manage Cloud Service เราจะ Monitor, Create, Add ให้ เพื่อให้ลูกค้าได้ Focus แค่ Business ของลูกค้า ลูกค้าทำธุรกิจขาย Online ก็ Focus ในเรื่องของการขาย Online งานหลังบ้าน งาน IT เรามี Team งานกว่า 50 ชีวิตคอยช่วยเหลือ รวมไปถึง
  • Security Operation Center (SOC) ด้วย เรามี Team คอย Monitor ให้ว่า App ถูก Attack รึป่าว หรือโดน Ransomeware จะทำยังไง หรือป้องกันเลย
cool.gif
:cool:
 
Last edited:

PlAwAnSaI

Administrator
สรุป PROEN Any Cloud ก็จะมี Solution ที่จะช่วย 3 ด้านด้วยกัน:
  1. เวลา: เราจะทำให้การ Develop ง่ายขึ้น การ Deployment, Provisioning เร็วขึ้น ด้วย CI/CD หรือว่า GUI ของเรา
  2. ความซับซ้อน: Infrastructure ทุกที่เป็น Standard เพราะ Cloud ของเราสามารถยืดไปยัง Public หรือ Private Cloud ไหนก็ได้ อยู่ในหน้าจอเดียวกันทั้งหมด และง่ายในการบริหารจัดการด้วย
  3. สุดท้ายคือเรื่องของค่าใช้จ่าย: ทุกอย่างเป็น Pay-as-you-grow และไม่มีปัญหาเรื่องของ Right size issue เพราะว่าเรา Support Auto Scale
แล้ว PROEN Any Cloud ดีกว่าเจ้าอื่นยังไง?:
  1. อยู่บนไหนก็ได้ ไม่ว่าจะเป็น Physical Server, VM, Private Cloud, หรือ Public Cloud (No vendor lock-in)
  2. ใช้งานง่ายด้วย UI ที่ Friendly ทำให้ประหยัดเวลา ไม่ว่าจะเป็นการ Deploy ใน Click เดียว, การตั้ง Auto Scale, มี Application และ Developer Tool ให้เลือกมากมาย
  3. มี Snapshot Backup ย้อนหลังให้ 7 วัน (RPO 24 ชม.)
  4. ไม่คิดค่า Bandwidth ทั้ง Domestic และ International หากใช้บริการ PROEN-TH Region
  5. Support ด้วยคนไทย 24x7 ตั้งแต่ระดับ Infrastructure, DB, จนถึง Coding และมีบริการ Turn Key Full Manage Service เรา Implement หลังบ้านให้หมด ลูกค้าแค่เข้ามาใช้งาน
1st PROEN Cloud Workshop
  1. สร้าง NEW ENVIRONMENT กันเลย
  2. เลือกภาษาที่จะใช้ในการพัฒนาก็จะมีให้เลือกทั้ง PHP, Java, Ruby, .NET, Node.js, Python, Docker Engine, Kubernetes Cluster, etc.

    ฝั่งซ้าย:
  3. เลือกว่าต้องการ Load Balancer มั้ย ก็จะมีให้เลือกมากมาย เช่น NGINX, Apache Balancer, HAProxy, etc.
    หาก Version ไหนไม่มีให้เลือกก็สามารถแจ้งให้เราเพิ่มมาได้ เพื่อให้ Support การใช้งานของ User
  4. เลือก Web Server เช่น Apache, etc.
  5. เลือก Cache, Database SQL เช่น MariaDB, MySQL, PostgreSQL, Docker Image, etc.
    หรือจะเป็น NoSQL เช่น MongoDB, Redis, etc.
  6. จะใช้ Share Storage มั้ย, หรือพวก VPS เช่น CentOS, Debian, Ubuntu, Windows 2019 (Included License)

    ตรงกลาง:
  7. ด้านบนจะเป็นในส่วน Vertical Scaling โดยเรามีหน่วยที่เรียกว่า Cloudlet (1 Cloudlet: 128 MiB, 400 MHz)
  8. และ Horizontal Scaling เป็น Scale แบบเพิ่มจำนวน Server หากเลือกมากกว่า 1 จะมี Load Balancer ขึ้นมา
  9. Disk Limit Maximum ต่อ 1 Container จะได้ 200 GB, อยากจะให้เป็น Shared Load Balancer (SLB) หรือป่าว, และยังสามารถ Assign Public IP ให้ได้ด้วย
  10. หรือจะ Attach Volume ก็ทำได้เหมือนกัน โดยสามารถใส่ Local Path ได้ หรือว่าจะเป็น Data / Master Container ก็ทำได้เหมือนกัน โดยกด Add
  11. หรือจะ Link Container แต่ละอันที่เราสร้างไว้ก็สามารถทำได้

    ฝั่งขวา:
  12. ก็จะมี 5 Region ให้เลือก TH-Proen, TH-CSLox, FR-AWS, JP-Google, และ SG-OVH
  13. ก็จะเป็นส่วนของราคาโดยจะบอกรายละเอียดทั้งหมดว่า Container แต่ละตัวมีค่าใช้จ่ายเท่าไหร่ ตั้งแต่ Minimum ที่เราเลือกไว้ จนถึง Maximum Scale ที่เราตั้งไว้ โดยสามารถเลือกดูได้เป็นรายเดือน / วัน / ชั่วโมง
  14. และสุดท้ายสามารถตั้งชื่อ Domain เองได้ แค่นี้ก็เรียบร้อย
ถัดมาก็จะเป็นในส่วนของ Import Code เราสามารถ Deploy Code ผ่าน:
  • พวกภาษา JSON, YAML, etc. ผ่าน File ในเครื่องของเรา
  • หรือว่าจะเป็น URL ดึงมาจาก GitLab หรือ GitHub ก็ดึงได้เหมือนกัน
  • หรือว่าจะเขียน Code เองก็สามารถเขียนได้เหมือนกัน
ในส่วนถัดมาก็จะเป็นในส่วนของ Marketplace ซึ่งของเรามี Application มากมาย ไม่ว่าจะเป็นในส่วนของ:
  • การ Support Dev และ Admin Tools อย่างเช่น Grafana, DevOps Lab ซึ่งสามารถที่จะทำ Pipeline ได้ Docker Engine, Docker Swarm Cluster, etc.
  • ถัดมาก็จะเป็นในส่วนของ Clusters ซึ่งในปัจจุบันเราก็จะมี MariaDB Cluster, Magento, Kubernetes Cluster, etc.
  • ถัดมาจะเป็น Content Management เช่น WordPress ก็มีให้เลือกทั้ง Standalone และ Cluster ที่ได้กล่าวไว้ก่อนหน้านี้ กดเข้าไปก็จะมีให้เลือก 3 แบบว่าจะเป็น Scale แบบไหน Low / Medium / High Load และสามารถเลือก Feature ได้ตามต้องการ ก็จะมี
    • ป้องกัน Brute Force Attack เราก็จะมี Web Application Firewall (WAF) ให้
    • และมี Galera Cluster ให้
    เลือกเสร็จแล้วสามารถตั้งชื่อ แล้วกด Install ได้เลย ก็จะไปขึ้นในหน้า Environment ของเรา
  • โดย Username, Password ต่างๆ จะถูกส่งไปให้ที่ Email ของเรา
ในส่วนถัดมาก็จะเป็นในส่วนของ GitLab:
  • เราสามารถ Manage ได้ 2 แบบ คือ CLI ผ่าน SSH หรือ GUI ผ่าน Web Browser
  • เราก็สามารถจะสร้าง Project ได้บนหน้า GitLab ของเรา
  • สามารถ Create จาก Template, จะ Import Project, , หรือว่าสร้าง Blank Project ใหม่เลยก็ทำได้เหมือนกัน
  • Project name: Gitlabtest
    สามารถเปลี่ยน User ได้
    และเลือก Visibility ได้ว่าจะให้เป็น Private หรือ Public
  • สร้างเสร็จเราก็จะสามารถ Add SSH Key ได้
  • หรือว่าจะ Manage CI/CD Tool นำ Configuration File มาใส่ เราก็จะสามารถ Test ในส่วนของ Run Pipeline ได้
  • Cloud ของเราสามารถผูกกับ Git ก็ได้เหมือนกัน โดยไปที่ Deployment Manager > Git / SVN > Add Repo
    Name: Project1
    URL: https://gitlab.th1.proen.cloud:4848/
    Use Authentication ก็จะมีให้เลือกเป็น Token หรือ SSH Key > Add + Deploy > และเลือก Environment ที่อยากจะผูก > Hooks แบบไหน แล้วก็กด Deploy ได้เลย
ถัดมาก็จะเป็นในส่วนของ Kubernetes Cluster:
  • ไปที่ Marketplace > Clusters > Kubernetes Cluster
    เลือก Dashboard: v2 / K8Dash
    Deployment: Development / Production ซึ่งจะแตกต่างกันอยู่ที่การ Scaling
    Ingress Controller: NGINX / HAProxy
    Modules: Prometheus & Grafana
  • พอสร้างเสร็จก็จะมี K8s Workers เป็นตัวที่เอาไว้ Run Application ต่างๆ
  • K8s Master จะเป็นตัว Control ตัว Worker ทั้งหมด
ซึ่งก็จะ Manage ได้ผ่าน CLI ด้วย SSH และ GUI:
  • ก็สามารถเลือกได้ว่าจะใช้อะไร Sign in: Token / Kubeconfig
  • ก็จะเข้ามาหน้าของ K8s Dashboard โดยสามารถ Monitor ในส่วนของ Workloads ได้
  • หรือว่าในส่วนของ Pods ต่างๆ ก็สามารถ Monitor ได้
  • การสร้าง Roles หรือ Configure พวก Service ต่างๆ ก็สามารถทำผ่านหน้า Dashboard ได้เลย
และก็จะมีในส่วนของ Prometheus ก็ใส่ /prometheus ต่อท้าย URL ของ Environment ได้เลย:
  • User: admin, Pass: ใน Email ที่ส่งไปให้ ซึ่งเราสามารถดึง API ข้อมูลต่างๆ มาได้ โดยจะมี Drop Down List ให้เลือกว่าอยากจะดึง Metric ตัวไหนมาดู coredns_health_count แล้วกด Execute
  • ก็จะขึ้นในส่วนของตัว Table ขึ้นมา หรือจะดูเป็น Graph ก็สามารถ Monitor ได้เหมือนกัน สามารถเลือก Interval และดู Stacked Graph ได้
หรือว่าจะเป็นส่วนของ Grafana ก็ Monitor ได้เหมือนกัน:
  • สามารถจะ Monitor ในส่วนของตัว Kubernetes Cluster ต่างๆ ไม่ว่าจะเป็น Pod, CPU, Memory, หรือ Disk Usage
Database Clustering:
  • ตัว Relational DB ก็จะมี MariaDB สามารถที่จะกด ON Auto-Clustering ได้เลย โดยจะมี Option ให้เลือก 3 แบบ
  • Primary-Primary: จะมี Master สองตัว ทั้ง Read และ Write
  • Primary-Secondary: จะเป็น Master กับ Slave ซึ่งตัว Master อาจจะทำ Read แล้ว Write ใส่ตัว Slave เป็นต้น
  • Galera: เป็น Multi-Master 3 ตัว โดยจะทำการ Replicate ตัว Primary ทุกตัว จะทำทั้ง Read และ Write
  • สังเกตว่าเวลา On Auto-Clustering จะมี ProxySQL เด้งขึ้นมา จะเอาไว้สำหรับป้องกัน Attack ต่างๆ เช่น SQL Injection เป็นต้น
มาลองดูตัว myenvironment ที่ทางผมสร้างไว้ก็จะมีในส่วนของ:
  • Load Balancer:
    • สามารถ Monitor ได้โดยกด Statistics ก็จะเป็น Metric ต่างๆ เช่น CPU, RAM, Network, และ Disk โดยสามารถเลือก Duration ได้ตามต้องการ
  • Application Server
  • SQL Database
  • และก็ VPS
  1. Cloud Model มี IaaS, PaaS, Saas, ProEn Any Cloud เป็น Cloud ประเภท Platform as a Service (PaaS)
  2. มีหน่วยเป็น Cloudlet
  3. สามารถเข้าถึงตัว Environment ได้ 2 วิธี คือ:
    • Command Line Interface (CLI) ผ่าน SSH
    • หรือผ่าน Web Browser
cool.gif
 
Last edited:

PlAwAnSaI

Administrator

Old school Way: On the day of deployment, the code may crash.
What is Container?:
  • Help packaging application's code:
    helps to bundle an application's code together with the related configuration files and libraries, and with the dependencies required for the app to run.
  • Make sure every environment is the same:
    address the problem of an application failing to run correctly when moved from one environment to another.
  • Portable applications:
    An application, its dependencies, and its configuration are packaged together as a container image. The container image instance could be deployed to the host OS for each environment.
The most popular container manager is Docker!:
lfVWBmiW_400x400.png
Docker Overview:Dockerfile > build > image > ship (push image) > registry > run (pull image & run) > container
Docker Build:
  • What is Dockerfile?:
    describes step by step instructions of all the commands need to run to assemble a Docker Image.
  • 'Docker Build' command:
    process Dockerfile generating a Docker Image in Local Image Cache, which can then start-up using the 'docker run' command, or push to a permanent Image Repository
    $ docker build -t .
Docker Registry:
  • What is Docker Registry?:
    A registry is a storage and content delivery system, holding named Docker images, available in different tagged versions. eg. Docker Hub, Quay.io, GCR, ECR
  • 'Docker Push' command:
    helps to push Docker images to the Docker registry.
    $ docker push [IMAGE:TAG]
Docker Run:
  • 'Docker Run' command:
    helps to run Docker image as a container instance.
    The basic takes this form:
    $ docker run [OPTIONS] IMAGE[:TAG|@DIGEST][COMMAND][ARG...]
https://katacoda.com/kubeopsskills/courses/docker-workshop/docker-basic
  • $ docker build -t docker-demo .
    $ docker images | grep docker-demo
    delete image by:
    $ docker rmi [3 letters Image ID]
    $ docker rmi d72
  • $ docker run --name docker-demo -d -p 5000:5000 docker-demo
    --name: used to name the Docker instance
    -d: is detached mode (a Docker instance runs in the background of terminal)
    -p: is mapping an internal Docker instance port to an outbound port
  • $ docker ps | grep docker-demo
  • $ curl http://127.0.0.1:5000
    {
    "hello": "world"
    }
  • Create user https://hub.docker.com to store your docker image on docker registry hub.docker
  • $ docker login -u
    $ docker login -u pwsi
  • $ docker tag docker-demo pwsi/docker-demo[:version]
    $ docker tag docker-demo pwsi/docker-demo:1.0.1 (release.major.minor)
    $ docker images | grep docker-demo
  • Upload image to your docker repository:
    $ docker push pwsi/docker-demo
  • Delete unused images:
    $ docker system prune -a
  • Delete using image:
    $ docker kill docker-demo
    $ docker ps
  • $ docker ps -a
    -a: all (with history)
    delete by:
    $ docker rm docker-demo
  • Run docker from hub.docker registry:
    $ docker run --name docker-demo -d -p 5000:5000 pwsi/docker-demo
    $ docker images
    $ docker ps
    $ curl http://127.0.0.1:5000
  • $ docker ps
    $ docker kill ec3
    $ docker run --name docker-demo-5001 -d -p 5001:5000 pwsi/docker-demo
    $ curl http://127.0.0.1:5000
    curl: (7) Failed to connect to 127.0.0.1 port 5000: Connection refused
    $ curl http://127.0.0.1:5001
  • $ docker logs docker-demo-5001
    $ curl http://127.0.0.1:5001
    $ docker logs docker-demo-5001
  • $ docker ps
    $ docker kill 70b
    $ docker ps -a
    $ docker rm 70b
    $ docker images
    $ docker rmi d72
  • $ docker run -d -p 8080:8080 nginx
  • $ mv Dockerfile source
    $ vi Dockerfile
    FROM python:3.9.6
    COPY . .
    RUN pip install -r requirements.txt
    ENTRYPOINT ["python"]
    CMD ["app.py"]
    $ docker build -t create-docker .
Is it good to run a container with Alpine application runtime image?
JDK Alpine Image:
  • OpenJDK > JDK (Application Runtime)
  • OS and its packages
Distroless Image: Contains only JDK and it does not provide any OS packages even shell commands.
https://katacoda.com/kubeopsskills/courses/docker-workshop/docker-distroless-image
  • $ docker build -t spring-distroless-app .
    $ docker images
  • $ docker run --name spring-distroless-app -d -p 8080:8088 spring-distroless-app
    $ docker ps
  • $ curl http://127.0.0.1:8080
    Hello, KubeOps Skills - Distroless Image
  • https://hub.docker.com/r/adoptopenjdk/openjdk11/tags
  • vi Dockerfile
    FROM adoptopenjdk/openjdk11:jre-nightly
  • $ docker build -t spring-non-distroless-app .
  • $ docker run --name spring-non-distroless-app -d -p 8081:8088 spring-non-distroless-app
    $ curl http://127.0.0.1:8081
    Hello, KubeOps Skills - Distroless Image
But, Are there any other ways to optimize these?Can developers focus on what matter most? (writing code)
Jib Plugin:
1*qtmqzzXuPLz3hfqY6O527w.png
Cloud Native Buildpacks:
transform your application source code into images that can run on any cloud.
Docker Storage:
  • Storage By default:
    all files created inside a container are stored on a writable container layer.
  • That mean:
    • The data doesn't persist when that container no longer exists, and it can be difficult to get the data out of the container if another process needs it.
    • A container's writable layer is tightly coupled to the host machine where the container is running. Can't easily move the data somewhere else.
volumes-shared-storage.svg
Docker Network:
  • 'Docker network' command:
    helps to connect, disconnect, create, list, inspect network in the docker environment.
    $ docker network [COMMAND]
    medium.com/@somprasongd/docker-networking-59b6637de3df
1*DBNLOEZJN3M-Q0LXOuSnew.png
Docker Architecture:
architecture.svg
cool.gif
 

PlAwAnSaI

Administrator

https://katacoda.com/kubeopsskills/courses/docker-workshop/docker-integration-basic
  • $ docker network create kubeops-network
    $ docker network ls | grep kub
  • $ docker run -d --name kubeops-mysql
    -e MYSQL_ROOT_PASSWORD=kubeops-root
    -e MYSQL_USER=kubeops_user
    -e MYSQL_PASSWORD=kubeops_password
    -e MYSQL_DATABASE=kubeops
    --net kubeops-network
    -v /tmp/mysql/data/:/var/lib/mysql
    -p 3307:3306
    mysql:latest
    -e: is environment that use in docker instance
    -v: is mounted volume from node to docker instance
    --net: is Connect a container to a network bridge
    $ docker images | grep mys
  • $ docker exec -it kubeops-mysql sh
    # cd /var/lib/mysql
    # ls
  • # cat > hello-kubeops.kubeops
    Hello World[ctrl+c]
    # ls
    # exit
    $ ls /tmp/mysql/data/
  • $ docker run -d --name kubeops-web
    -p 8081:8088
    --net kubeops-network
    sikiryl/spring-app
    $ docker ps
    $ curl http://127.0.0.1:8081
    Hello, KubeOps Skills
Docker Compose:
  • The Compose file is a YAML file defining services, networks and volumes. The default path for a Compose file is ./docker-compose.yml
    Can use either a .yml or .yaml extension for this file. They both work.
efcq_xUhGpF1Guqb5daiybmhMQL9Q_KzMtpmddPB2en0vrJzYlPqI1CAc3KDSjFSiBJApBYPfnmwlyrRAtzpIzHrDdpO-XhnWEmYKk4MP20zyq708-pvIxl-6MNbQACxe5nlwi2G
https://katacoda.com/kubeopsskills/courses/docker-workshop/docker-compose
  • $ cat docker-compose.yaml
    version: '3.8'

    services:
    spring:
    image: sikiryl/spring-app
    ports:
    - 8081:8088
    depends_on:
    - kubeops-mysql
    [container_name: kubeops-spring]

    kubeops-mysql:
    image: mysql:latest
    environment:
    - MYSQL_ROOT_PASSWORD=kubeops-root
    - MYSQL_USER=kubeops_user
    - MYSQL_PASSWORD=kubeops_password
    - MYSQL_DATABASE=kubeops
    volumes:
    - /tmp/mysql/data/:/var/lib/mysql
    ports:
    - 3307:3306
  • $ docker-compose up -d
    $ docker ps
    $ ls /tmp/mysql/data/
    $ curl http://127.0.0.1:8081
    Hello, KubeOps Skills
  • $ docker-compose down
    $ docker ps -a
    $ docker images
  • Can run only one docker:
    $ docker-compose up -d spring
Is it good enough to use only Docker containers for high scalability design?
How to handle scheduling containers based on suitable cpu and memory requirements across virtual machines?
How to handle container when it down?
Kubernetes comes to rescue!:
what-is-kubernetes-xenonstack.png
  • Kubernetes helps to scale containers based on cpu and memory requirements across virtual machines
  • supports container self healing with liveness probes
  • supports blue green deployment as default container deployment strategy
  • provides centralized configuration and secret management
  • easily to integrate Cloud services with Cloud providers
ทำความรู้จักกับ Blue-Green Deployment กันหน่อย

Rollback Strategy:
  • Rolling undo to previous deployment version:
    $ kubectl rollout history deployment
    $ kubectl rollout undo deployment
  • Rolling undo with revision:
    $ kubectl rollout undo deployment -to-revision=
But ... How to manage / deploy containers on Kubernetes with the same experience working with Docker?
Docker Stack comes to rescue!:
  • helps to manage / deploy containers on Kubernetes with the same configuration as Docker Compose
  • reduces Kubernetes learning curve / complexity by leveraging the ease of Docker Compose
  • supports immutable infrastructure, can use only single Docker Compose file for all environments
  • https://medium.com/red-crane/เบื้องหลัง-compose-on-kubernetes-มีอะไรอยู่ในนั้น-9f93f665e560
https://katacoda.com/kubeopsskills/courses/docker-workshop/docker-stack
  • $ docker stack deploy kubeops-stack -c docker-compose.yaml
    $ docker stack ls
    $ docker stack ps kubeops-stack
    $ kubectl get services
    $ kubectl describe services kubeops-mysql-published
    $ kubectl get pods
  • $ export IP=$(kubectl get services -l com.docker.service.id=kubeops-stack-spring -o jsonpath='{ .items
  • .status.loadBalancer.ingress[0].ip }')
    $ curl http://$IP:8081
    Hello, KubeOps Skills
  • $ docker stack rm kubeops-stack
    $ kubectl get pods
  • $ kubectl get services --show-labels
    $ kubectl delete services -l "com.docker.service.id in (kubeops-stack-kubeops-mysql,kubeops-stack-spring.,com)"
    $ kubectl get services
Best Practices:
  1. Prefer minimal base images
    prefer Distroless images
  2. Least privilege user
    create a dedicated user and group on the image, with minimal permissions to run the application
  3. Use Copy instead of ADD
    ADD could result in Man In The Middle (MITM) attacks, sources of malicious data
  4. Don't leak sensitive data to Docker Images
    Separate sensitive data out of application source code and keep them in Vault, hence, docker build phase won't contains any sensitive data
  5. Don't Use the latest tags
    Docker image owners should not use the latest image tags, which may result in application breaking changes if the latest image tags would not compatible with the application
    e.g. FROM kubeops:8-alpine -> -
  6. Use labels for metadata
    Labels with metadata for images provide useful information for users
DevOps World:
image.png
image-1.png
Modernizing Applications for the Cloud
cool.gif
 

PlAwAnSaI

Administrator

How to install Kasm Workspaces on ProEn Cloud:
  1. + NEW ENVIRONMENT > Custom > Select Image > Search > Docker Hub: lyws365/kasmweb-desktop > Next > Create
  2. Kasm Workspaces - Single Server Installation
  3. Add public IP
  4. Open environment in Browser
  1. Container คืออะไร?
  2. ประวัติของ Container

  3. Building Block

  4. Container Runtime

  5. Docker สำหรับ Mac และ Windows

  6. การเข้าถึง Remote Docker Daemon
Pipeline as Code:
test: script:
  • apt-get update -qy
  • apt-get install -y nodejs
  • bundle install --path /cache
  • bundle exec rake db:create RAILS_ENV=test
  • bundle exec rake test
staging:
type: deploy script:
  • gem install dpl
  • dpl --provider=heroku --app=gitlab-ci-ruby-test-staging --api-key=$HEROKU_STAGING_API_KEY
only:
  • master
production: type: deploy script:
  • gem install dpl
  • dpl --provider=heroku --app=gitlab-ci-ruby-test-prod --api-key=$HEROKU_PRODUCTION_API_KEY
only:
  • tags
Modern Infrastructure:
  1. Cloud
  2. docker
  3. kubernetes
Cloud Characteristics:
  • Broad network access
  • Multi-tenancy and resource pooling
  • Measured service
    DevSecOps Core Value:
  • On-demand self-service
  • Rapid elasticity and scalability
Cloud as a Service Model:
cloud-service-model.jpg
Type of Cloud:
  • Private Cloud: vmware, Nutanix, openstack
  • Public Cloud: Amazon Web Services, Azure, Google, Alibaba, Tencent Cloud, Huawei
  • Hybrid Cloud: AWS Outposts, Anthos, Azure Stack
  • Hybrid & Multi Cloud = Private + Public + Hybrid Cloud
  • Platform as a Service (PaaS): Heroku, kubernetes, App Engine, PROEN Any Cloud
  • Serverless: AWS Lambda, Google Cloud Functions, Cloud Run
  • Backend as a Service (BaaS): Firebase
Compare time-to-result:
gcp-time-comparison10pj.max-700x700.PNG
Why Serverless and why not?:
Pros:
  • Time-to-result
  • Scale automatically
  • Easy to maintain
  • Focus on business
  • Cheap for low traffic
Cons:
  • Vendor lock-in
  • Cold start problem
  • Hard to troubleshoot on complex system
  • Expensive for high traffic
  • Security concern
  • CI/CD challenge
Server and Serverless Cost:
image_10.png
Kubernetes Architecture:
k8s-architecture.png
Distribution of Kubernetes:
  • Installation Tools: minikube, KubeSpray, kops, K3S, MicroK8s
  • Commercial: OpenShift, VMware Tanzu, RanCher
  • Public Cloud: Azure Container Service, AmazonEKS, IBM Cloud Container Service
Kubernetes Concepts:
  • Pods
  • Deployments
  • Services
  • Batch Execution
  • Rolling Update
  • Storage Orchestration
  • Service Discovery
  • Scheduling
  • Autoscaling
  • Secret and Configuration Management
Automation Technologies: Ansible, HashiCorp Terraform, docker Compose, kubernetes, Chef, puppet labs
Infrastructure as Code (IaC):
  • ---
    service_name: nginx
    os_instance:
    image: xenial-server-cloudimg-amd64
    key_name: raed
    flavor: m1.small
    network: network
    security_groups: default
    volume_size: 16
    project_name: ats
    count: 3

    docker_image:
    nginx:
    image: nginx:1.11.3-alpine
    name: nginx
    hostname: nginx
    published_ports:
    - "80:80"
    - "443:443"
cool.gif
 

PlAwAnSaI

Administrator
  1. Platform เรา Support 4 OS VPS: CentOS, Debian, Ubuntu, & Windows 2019
  2. DB Support ทั้ง SQL และ NoSQL
  3. MariaDB Support Auto-Clustering 3 แบบ: Primary-Primary, Primary-Secondary, & Galera
  4. สามารถทำการ Scale ได้ 2 แบบ: Vertical & Horizontal Scaling
  5. สามารถ Deploy Docker / Kubernetes Cluster ได้ 2 แบบ: ผ่านหน้า NEW ENVIRONMENT หรือ MARKETPLACE
1*RVB7JPjnr-hPgCS0jBqc8g.png
Kong API Gateway:
Kong มีความยืดหยุ่นมาก ลูกค้าทุกคนมีสถาปัตยกรรม, ความต้องการ, หน่วยธุรกิจที่แตกต่างกัน Kong จึงต้องมีความยืดหยุ่นในการทำงานที่หลากหลาย นอกจากนี้ยังมีขนาดเล็กและสามารถนำไปใช้ได้ทุกที่ เพราะถูกสร้างขึ้นในโลกที่มี Container, Kubernetes และ Microservice อยู่แล้ว
  • เนื่องจากโลกกำลังเปลี่ยนแปลง เราจึงต้องเปลี่ยนตาม นั่นคือเหตุผลที่เรากำลังเดินทางจากแบบรวมศูนย์ (Centralized) สู่การกระจาย (Decentralized) - Kong พร้อมช่วยคุณเพิ่มประสิทธิภาพในทุกขั้นตอนของการเดินทางนั้น ไม่ว่าคุณจะมี Monolith, Microservice, Service Mesh หรือทั้งหมดที่กล่าวมา
  • Solution API แบบเดิมอื่นๆ ทำงานได้ดีสำหรับ Monolith แต่จะค่อยๆ ลดประสิทธิภาพลงเมื่อใช้กับสถาปัตยกรรมแบบกระจายศูนย์ (Distributed/Decentralized)
  • นี่คือเหตุผลที่ Kong คือทางออกสำหรับวันนี้ และวันพรุ่งนี้ - Kong จะช่วยเพิ่มประสิทธิภาพทุกย่างก้าวของการเดินทางของคุณ
ทำไม Platform API แบบเก่าถึงพาเราไปยังเป้าหมายไม่ได้?:
  • Gateway แบบเก่าและ Platform API เป็น Monolith
  • การปรับขนาดมีราคาแพงเพราะต้องการ CPU มาก
  • สร้างขึ้นบน VM Java ที่มีขนาดใหญ่ จึงไม่สามารถทำงานกับ Container ได้ดี หรือสถาปัตยกรรมแบบกระจาย (Distributed) โดยทั่วไป แม้จะเรียกว่า "Microgateway" ก็ขึ้นอยู่กับ "VM" ที่ถูกติดตั้งอยู่ดี
  • Solution แบบเดิมนั้นก็ใช้ได้ถ้าต้องการเพียง Monolith แต่ถ้าต้องการจัดการกับสภาพแวดล้อมแบบกระจาย (Decentralized) ที่ซับซ้อน พวกมันทำไม่ได้

  • API Gateway: ใครดีกว่าใคร?: Kong vs krakenD vs Tyk
  • Getting Started with WordPress, Kubernetes and Apps Security With All Stars Expert

  • 5 ข้อดีของ PROEN Cloud & Workshop สำหรับสาย Kubernetes
    1. สร้าง Kubernetes Cluster ได้ง่าย
    2. สามารถ Custom Domain ได้
    3. ตั้งค่า Scale Node ผ่าน UI ได้
    4. มี Rancher Add-on
    5. มีรายละเอียดค่าใช้จ่ายตามจริง
      .
  • แนะนำการใช้งาน Docker

    Deploy Zabbix โดยใช้ Docker


  • เสริมความปลอดภัยให้ Backend Applications ด้วย NGinX App Protect - ติดตั้ง NGinX Plus และ NGinX App Protect

  • ปรับแต่ง NGinX App Protect - transparent mode
  • Register PROEN Cloud

  • Deploy Environment and Integrate CI/CD Tool on PROEN Cloud

  • Auto Scaling and Billing

  • Introduction to K8s on PROEN Cloud platform

  • Deploy docker on PROEN Any Cloud

  • index.php on PROEN Any Cloud: Root > var > www > webroot > ROOT

  • อยากตั้งชื่อให้ Node A ภายใน Environment:
    1. Node B > Additionally
    2. Links > Add
    3. เลือก Node A > Alias: test
    4. SSH to Node B
    5. NodeB:~# ping test -c 5
      64 bytes from web_1 (10.104.7.99): icmp_seq=1 ttl=64 time=0.132 ms
      .
  • ผูก Github ทั้ง Account กับ PROEN Any Cloud:
    1. สร้าง Token บน Github กันก่อน วิธีนี้จะเอาไปใช้ได้กับทุก Project บน Account เราเลย > Account เรากลมๆ ขวาบน
    2. Settings > Developer settings
    3. Personal access tokens > Generate new token
    4. Note, Expiration, repo > Generate token แล้วเก็บ Key ไว้ให้ดี ปิดไปแล้วต้อง Regenerate ใหม่ลูกเดียว > Copy
    5. แล้วก็ไปที่ Node ที่จะผูก > Deployments > Deploy from Git / SVN
    6. Repository: Add New Repository > Name, URL: copy มาจาก Github repository ที่ต้องการ > Code > HTTPS
    7. Use Authentication > Login: คือ Username Github ของเรา > Token: จากข้อ 4. > Add
    8. สามารถเลือก Check and auto-deploy updates และตั้งเวลาที่ต้องการให้ Update ได้ หรือไม่เลือก ค่อย Manual Update เอาก็ได้ > Deploy
    9. กรณีภาษา PHP สามารถดู Log ได้จาก httpd > vcs_update.log
    10. ลองเข้าหน้า Web ดูก็จะได้แล้ว ทดสอบ Update File บน Github ดูได้เลย
      .
  • ทีนี้มาดูวิธีผูกแต่ละ Repo กันบ้าง:
    1. ไปที่ Repo บน Github > Settings
    2. Deploy keys > Add deploy key > Title
    3. ส่วน Key มาดูวิธีสร้างบน Windows กัน > cmd
    4. > ssh-keygen > จะได้มา 2 File
      Your identification has been saved in C:\Users\naN/.ssh/id_rsa.
      Your public key has been saved in C:\Users\naN/.ssh/id_rsa.pub.
    5. เปิด File id_rsa.pub กับ Notepad แล้ว Copy ไปวางบน Github ข้อ 3. ถ้าอยากให้ Push ได้ด้วยก็เลือก Allow write access > Add key
      Git-push-command.JPG

    6. แล้วก็ไปที่ Node ที่จะผูก > Deployments > Deploy from Git / SVN
    7. Repository: Add New Repository > Name, URL: copy มาจาก Github repository ที่ต้องการ > Code > SSH
    8. Use Authentication > Select Key > Add Private Key > Name, Key: Copy มาจาก File id_rsa > Add
    9. แล้วก็ทำตามข้อ 8. วิธีเดียวกับผูกทั้ง Account ต่อได้เลย
      .
  • ผูก Github แล้ว Access ไม่ได้:
    1. SSH ไป Node ที่ผูก Git ไว้ > ตรวจสอบ Port ว่าใช้ Port ไหน
      netstat -tunpl
      tcp6 0 0 :::5201 :::* LISTEN 1308/dotnet
    2. เปิด Port บน Platform PROEN Any Cloud ด้วย > Change Environment Topology
    3. Variables > Add
    4. Name: JELASTIC_EXPOSE, Value: 5201 > Apply
    5. และ Restart Nodes

Calico คืออะไร?:
Project Calico ถูกออกแบบมาเพื่อลดความซับซ้อน การปรับขนาด และรักษาความปลอดภัยของเครือข่าย Cloud และเป็น Open Source ที่ใช้กับเครือข่าย Kubernetes และ Network Policy สำหรับ Cluster ทั่วทั้ง Cloud เดิมได้รับการออกแบบสำหรับโลกของ Cloud-native ที่ทันสมัยในปัจจุบัน และสามารถทำงานบน Public และ Private Cloud ภายใน Kubernetes Calico เริ่มปรากฏให้เห็นเป็น Framework หรือ Plugin เครือข่ายที่ได้รับความนิยมมากที่สุดเจ้านึง โดยมีองค์กรหลายแห่งใช้งานตามการเติบโต
Calico ใช้ Fabric Network IP Pure เพื่อทำให้เครือข่าย Kubernetes มีประสิทธิภาพสูง และ Engine Policy ที่ช่วยนักพัฒนาในการจัดการ Policy Network ระดับสูง Calico และ Kubernetes ร่วมกันสร้าง Platform ระบบ Cloud ที่ปลอดภัยซึ่งสามารถปรับขนาดโครงสร้างพื้นฐานของคุณเพื่อรองรับผู้ใช้งานหลายแสนคน
Calico มีความสามารถทางด้านเครือข่าย Layer 3 และเชื่อมโยง Router เสมือนกับแต่ละ Node ช่วยให้ Host สามารถคุยกับ Host และเชื่อมต่อเครือข่าย pod ของ Kubernetes (IPAM) Calico อนุญาตให้สร้างขอบเขตของ Zone ผ่าน BGP Routing หรือการ Encapsulation ผ่าน IP on IP หรือ VXLAN ได้อีกด้วย

k8s-calico-graph-1800x1013.png
Calico สามารถใช้สำหรับสร้าง Backend เครือข่าย (BGP, Pod IPAM), สร้าง Policy เครือข่าย และรองรับทั้งเครือข่าย IPv4 และ IPv6
การใช้ Calico สำหรับ Kubernetes Networking:

Calico Integrate กับ Kubernetes ผ่าน Interface เครือข่าย Container Network Interface (CNI) และมีความสามารถมากมายที่ทำให้มีความโดดเด่นในระบบ Kubernetes เมื่อเทียบกับทางเลือกอื่น เช่น Weave, Canal หรือ Flannel
:cool:
 
Last edited:

PlAwAnSaI

Administrator
อะไรทำให้ Calico เป็นที่นิยม?:
ในระบบ Kubernetes Calico ถือเป็นหนึ่งใน Framework Plugin ที่ได้รับความนิยมมากที่สุด โดยมีองค์กรหลายร้อยแห่งใช้งานในระดับต่างๆ มีลักษณะสำคัญสามประการที่ทำให้ Calico มีความโดดเด่น:
  1. ความสามารถในการปรับขนาด - Calico สร้างขึ้นบนสถาปัตยกรรมการปรับขนาดออกตาม Layer 3 แบบกระจายอย่างสมบูรณ์ ดังนั้นจึงสามารถปรับขนาดได้อย่างราบรื่นจาก Labtop นักพัฒนาเครื่องเดียวไปจนถึงองค์กรขนาดใหญ่
  2. การแก้จุดบกพร่อง – Calico อาศัย Layer IP และง่ายต่อการแก้ไขจุดบกพร่องด้วยเครื่องมือที่มีอยู่ ซึ่งเป็นส่วนสำคัญสำหรับการรักษาความปลอดภัยขององค์กร
  3. รองรับ Micro-Segmentation – Plugin ช่วยให้ผู้ดูแลระบบหรือผู้ใช้งานสามารถกำหนด Policy Network ระหว่างหลายส่วนหรือ Container ได้ ดังนั้นคุณจึงสามารถควบคุมได้ว่าส่วนใดจะสื่อสารกับส่วนใด ซึ่งมีความสำคัญมากในโลกของการรักษาความปลอดภัย ด้วยการใช้ประโยชน์จาก Kernel Linux ดั้งเดิม ผู้ใช้ Calico ยังสามารถใช้เครื่องมือเครือข่ายที่มีอยู่ รวมถึง IP-Tables เพื่อทำ Micro-Segmentation ในระดับสูงอีกด้วย

ด้วยเหตุผลที่กล่าวมาข้างต้น การนำ Calico มาใช้ จึงเกิด Community เพิ่มขึ้นอย่างมากโดยที่แม้แต่ AWS และ Google Cloud ก็ยังใช้ Calico เป็นมาตรฐาน Policy Network Container บน Cloud

Calico เป็นหนึ่งใน Solution ระบบเครือข่ายที่น่าเชื่อถือที่สุดสำหรับ Cloud-native Application ต่อภารกิจสำคัญ ด้วยการใช้งานจริงใน Production Environment หลายร้อยแห่ง ทำให้ Calico ได้รับชื่อเสียงอย่างรวดเร็วในด้านประสิทธิภาพระดับองค์กร ความสามารถในการปรับขนาดและความน่าเชื่อถือ


:cool:
 
Last edited:
Top